LLM API Engine: How to Build a Dynamic API Generation Engine Powered by Firecrawl
Introduction: From Unstructured Data to Usable APIs
Have you ever wanted to extract specific information from websites automatically? Maybe you needed stock prices, product details, or news headlines for a project. Traditionally, this required writing complex web scraping code, dealing with HTML parsing, and building custom APIs - tasks that demand significant programming skills. The LLM API Engine changes this by letting you create data extraction APIs using simple English descriptions instead of code.
In this article, we'll break down how the LLM API Engine works step by step. You'll learn how it uses AI (specifically OpenAI) to understand what data you want, generates a structured schema automatically, and uses Firecrawl's intelligent web scraping to extract exactly what you need from websites. By the end, you'll understand how to transform messy web data into clean, structured APIs that you can use in your applications.
Want to see it in action before diving in? Check out the video demonstration at the top of this article. If you're ready to try it yourself, we'll cover the setup instructions in the next section. You'll be surprised how quickly you can build powerful APIs without writing a single line of scraping code.
Architecture and Technology Stack
The LLM API Engine is built with a flexible architecture that separates the parts that create APIs from the parts that run them. This design makes it easy to build APIs in one place and run them anywhere you want.
At the heart of the system are two main components:
-
API Builder Interface: This is the web application you interact with. Built using Next.js 14 and React 18, it provides a step-by-step interface where you describe what you want, generate a schema, select data sources, and create your API - all without writing code. The builder handles the complex work of turning your instructions into a working API.
-
API Endpoints: Once created, your APIs can run independently. This means you can deploy them on various platforms like Vercel, Cloudflare Workers, or AWS Lambda. Your data extraction APIs will work even if the builder interface is offline.
The system uses several key technologies to make this magic happen:
- OpenAI: Understands your natural language descriptions and automatically generates data schemas
- Firecrawl: Powers the intelligent web scraping that extracts precisely the data you need from websites. Unlike traditional scrapers, Firecrawl can understand context and website structures, making it possible to extract specific data points without brittle CSS selectors or XPath.
- Serper: Provides search engine capabilities to find relevant websites and data sources
- Upstash Redis: Stores your API configurations and cached data for fast retrieval
- Zod: Validates the extracted data against your schema, ensuring you get clean, structured results
This modular design offers three main deployment options:
- Use the builder interface only to create and test APIs
- Deploy your endpoints independently for optimal performance
- Combine both approaches based on your needs
Local setup
To run the LLM API Engine locally, you'll need:
- Node.js 18+ installed on your system
- Package manager (npm, yarn, or pnpm)
- API keys for OpenAI, Firecrawl, Serper and a Redis instance
Follow these steps:
- Clone the repository:
git clone https://github.com/developersdigest/llm-api-engine.git
cd llm-api-engine- Install dependencies:
npm install- Create a
.envfile with the following variables:
OPENAI_API_KEY=your_openai_key
NEXT_PUBLIC_FIRECRAWL_API_KEY=your_firecrawl_key
SERPER_API_KEY=your_serper_key
UPSTASH_REDIS_REST_URL=your_redis_url
UPSTASH_REDIS_REST_TOKEN=your_redis_token
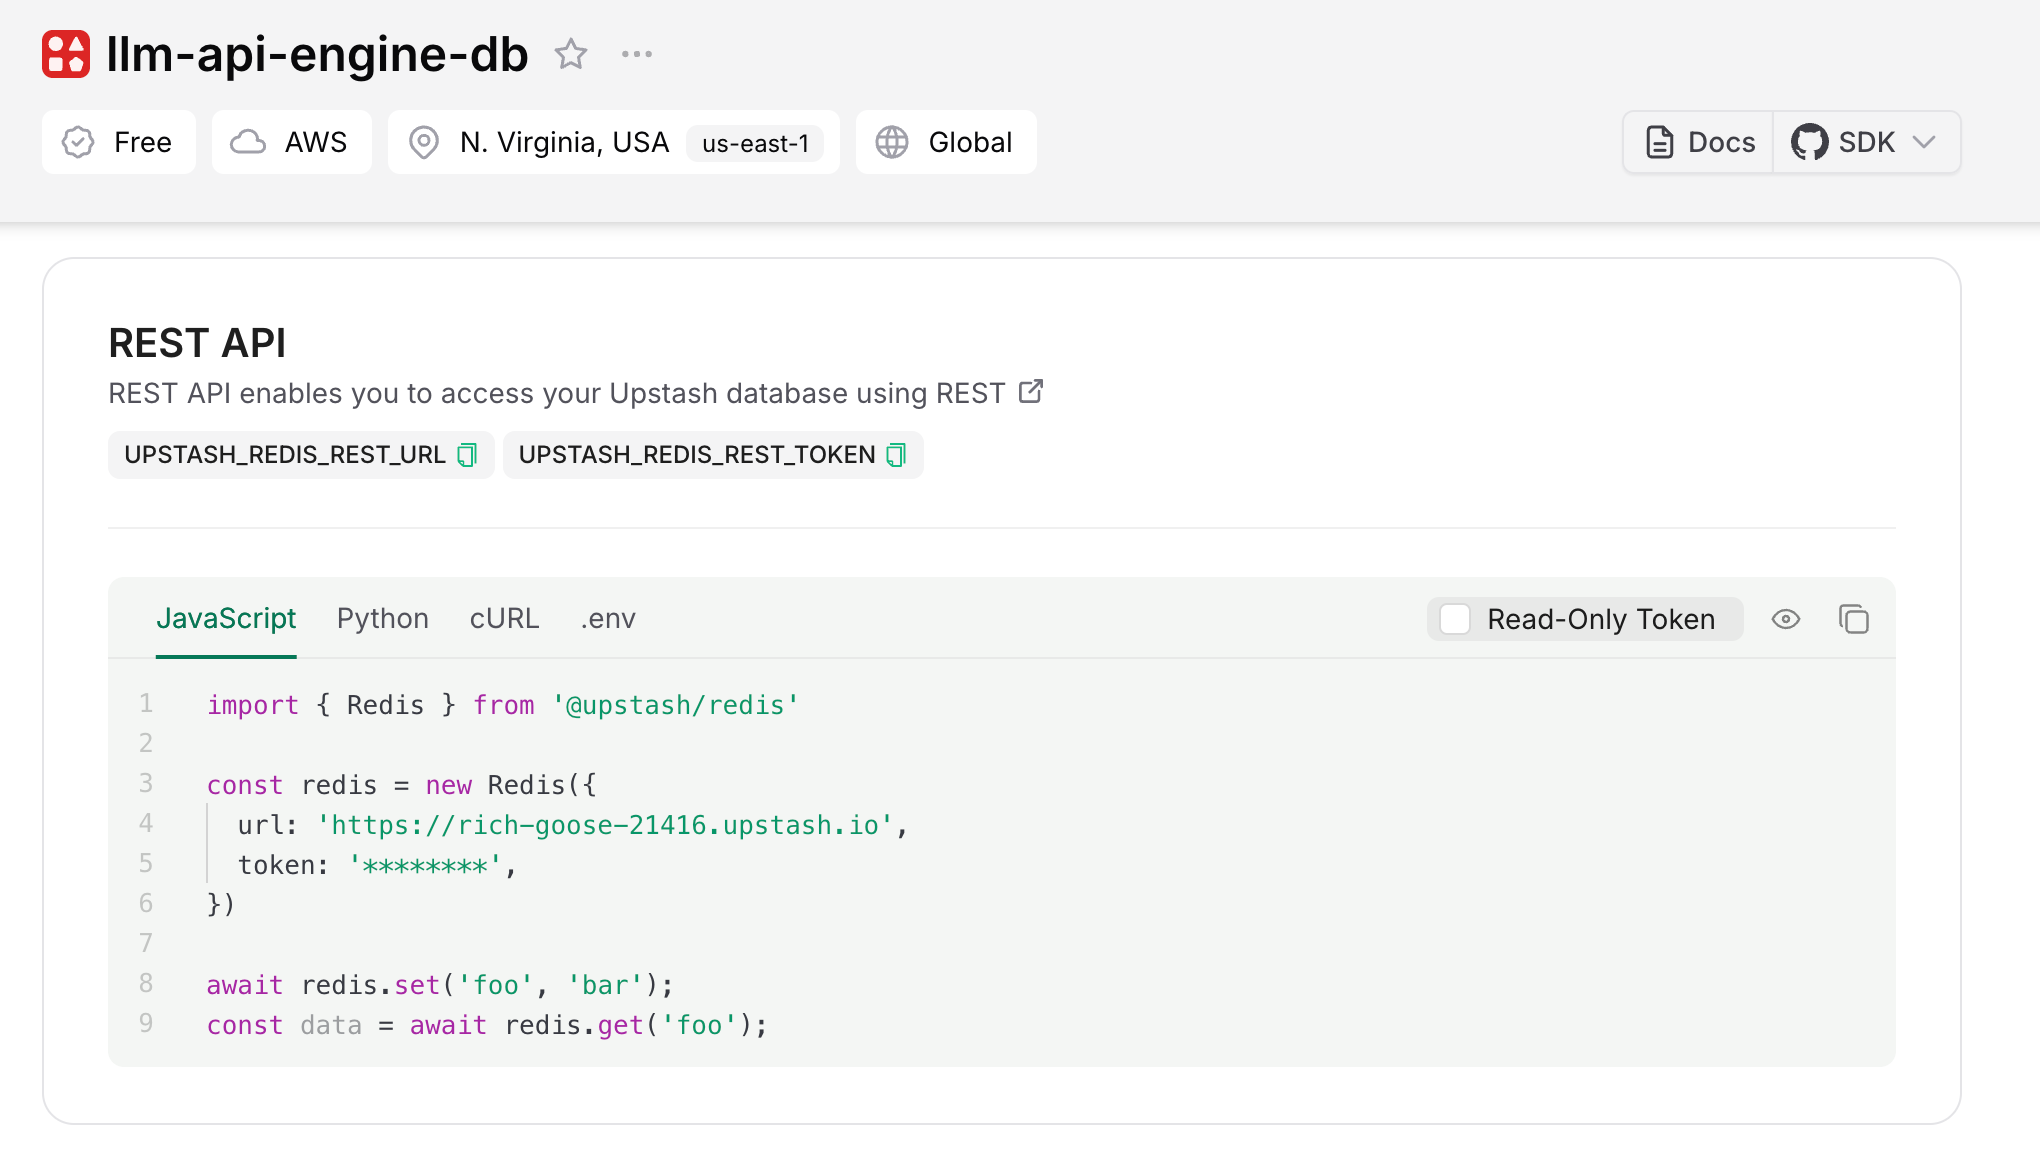
NEXT_PUBLIC_API_ROUTE=http://localhost:3000To get your variables for Redis, you need to create an account on Upstash and a free Redis instance, which will provide you with a URL and token. You can find them under the "Rest API" section of your instance:
- Start the development server:
npm run dev- Open http://localhost:3000 in your browser to use the application
High-level Overview of the Project Structure
Before diving into how to use the LLM API Engine, let's understand how the project itself is organized. The codebase follows a modern web application structure using Next.js, which combines frontend and backend code in a single project.
Directory Structure
The project follows a standard Next.js 14 App Router structure:
/app: The main application code/app/page.tsx: The home page component with the multi-step API creation interface/app/api/: Backend API routes that handle server-side processing/app/api/search/: API route for finding data sources/app/api/extract/: API route for extracting data from websites/app/api/results/[endpoint]/: Dynamic API route for serving your created APIs
/app/components/: Reusable UI components
/public: Static assets like images and fonts
Development Paradigms
The LLM API Engine follows several modern web development paradigms:
-
Component-based architecture: The UI is built with React components, making the code modular and reusable.
-
Server-side and client-side code: Next.js 14 allows mixing server and client components, handling data fetching and rendering efficiently.
-
API routes as microservices: Each API endpoint functions like a small, focused microservice with a specific responsibility.
-
Environment-based configuration: The app uses environment variables for all configuration, making it easy to deploy to different environments.
-
Stateless design: The application maintains minimal state, relying on external services (Redis, OpenAI, Firecrawl) for persistence and processing.
Key files to understand
If you want to understand how the engine works, these are the most important files to explore:
-
app/page.tsx: The main interface where users create APIs. This file orchestrates the entire API creation process and contains the step-by-step wizard UI. -
app/api/search/route.ts: Handles finding relevant data sources using Serper's API. -
app/api/extract/route.ts: Manages the data extraction process using Firecrawl. -
app/api/results/[endpoint]/route.ts: The generated API endpoint that users will ultimately call. This file shows how the extracted data is served as an API.
Data Flow
The project follows a clear data flow pattern:
- User input (API description) → OpenAI → Schema generation
- Schema + Search query → Serper → Data sources
- Schema + Data sources → Firecrawl → Extracted data
- Extracted data → Redis → Cached API responses
This separation of concerns makes the codebase maintainable and allows each part to be updated independently. The project demonstrates how to build a complex AI application by connecting specialized services together with clean interfaces.
Now that you understand the project structure, let's explore how to use it, starting with how to describe your API.
Step 1: Describing Your API
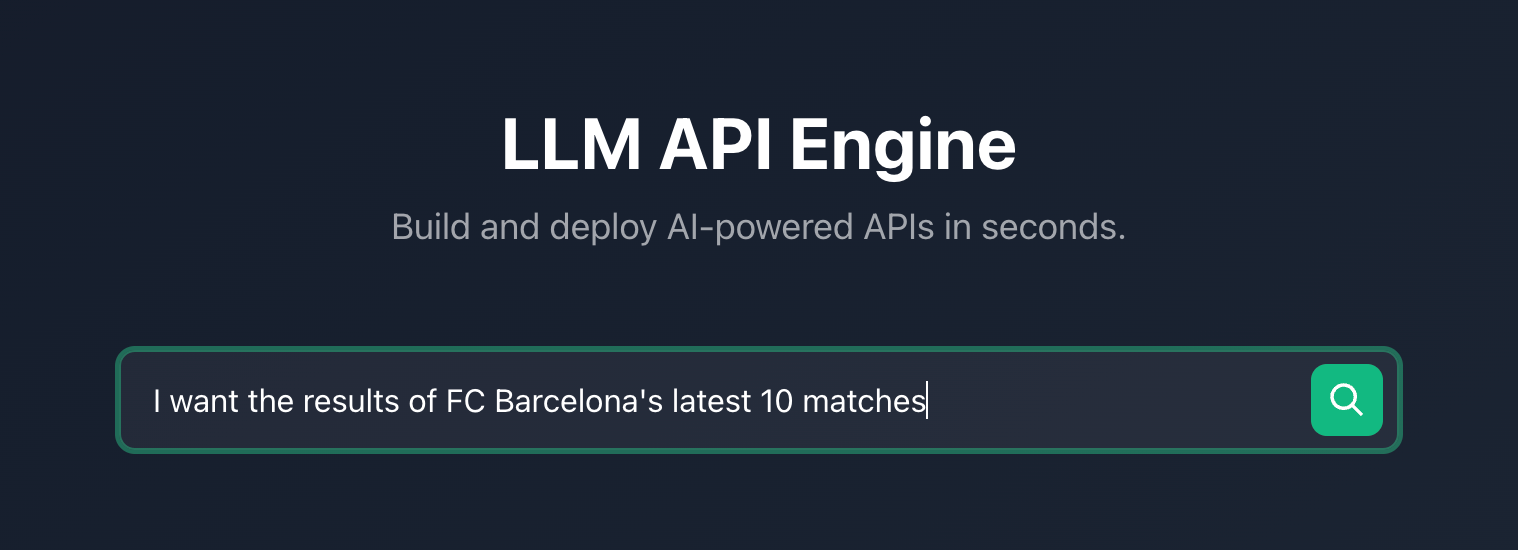
The first step in creating an API with the LLM API Engine is describing what data you want to extract. This is where the magic begins - instead of writing complex code, you'll use everyday language to tell the system what you need.
How to Write Effective API Descriptions
Your description directly influences the quality of data you'll get. Think of it as giving instructions to a smart but literal assistant. The more specific you are, the better your results will be. Here's how to craft effective descriptions:
-
Be specific about data points: Instead of "Get company information," try "Extract the company name, CEO, founding year, number of employees, and quarterly revenue."
-
Mention formats when relevant: If you need specific formats, say so: "Get stock prices in USD with dollar signs" or "Extract dates in MM/DD/YYYY format."
-
Include context: Tell the system what kind of sites you're targeting: "Extract product prices and ratings from e-commerce websites" or "Get financial metrics from company investor relations pages."
Under the Hood
When you enter your description, several things happen behind the scenes:
-
Query Processing: Your description is stored as a string variable and becomes the foundation for all subsequent API generation steps. The system preserves your exact wording to ensure the AI models understand your intent.
-
Language Analysis: The system identifies key data points, formats, and context from your description. It looks for nouns that represent data fields, adjectives that describe formatting preferences, and contextual hints about sources.
-
Intent Recognition: The system determines whether you're looking for numerical data, text information, structured lists, or other formats to prepare for appropriate schema generation.
-
Query Optimization: While not changing your original intent, the system may internally enhance your query to improve extraction accuracy, adding context or specificity where needed.
For full implementation details of how your query is processed under the hood, continue reading the next sections.
Examples of Good API Descriptions
Let's look at some examples that work well:
- Financial data API:
Extract current stock price, market cap, 52-week high/low, P/E ratio, dividend yield, and earnings per share for technology companies. Include the currency symbol with monetary values.- Product comparison API:
Extract product name, price, rating (out of 5 stars), key features (as a list), availability status, and shipping information from e-commerce sites.- News aggregation API:
Get article headlines, publication date, author name, short summary (first paragraph), and category/topic tags from news websites. Format dates as MM/DD/YYYY.These descriptions work well because they:
- Clearly identify the specific data points needed
- Provide context about the type of source websites
- Include format preferences where needed
- Group related information logically
What to avoid
Some common pitfalls to avoid in your descriptions:
- Being too vague: "Get data about companies" doesn't give enough direction
- Being too complex: Don't include complicated conditionals or nested requirements
- Technical jargon: No need to mention HTML elements, CSS selectors, or database fields
With a clear, specific description in place, the LLM API Engine has everything it needs to move to the next step: generating a structured schema based on your requirements.
Step 2: Schema Generation
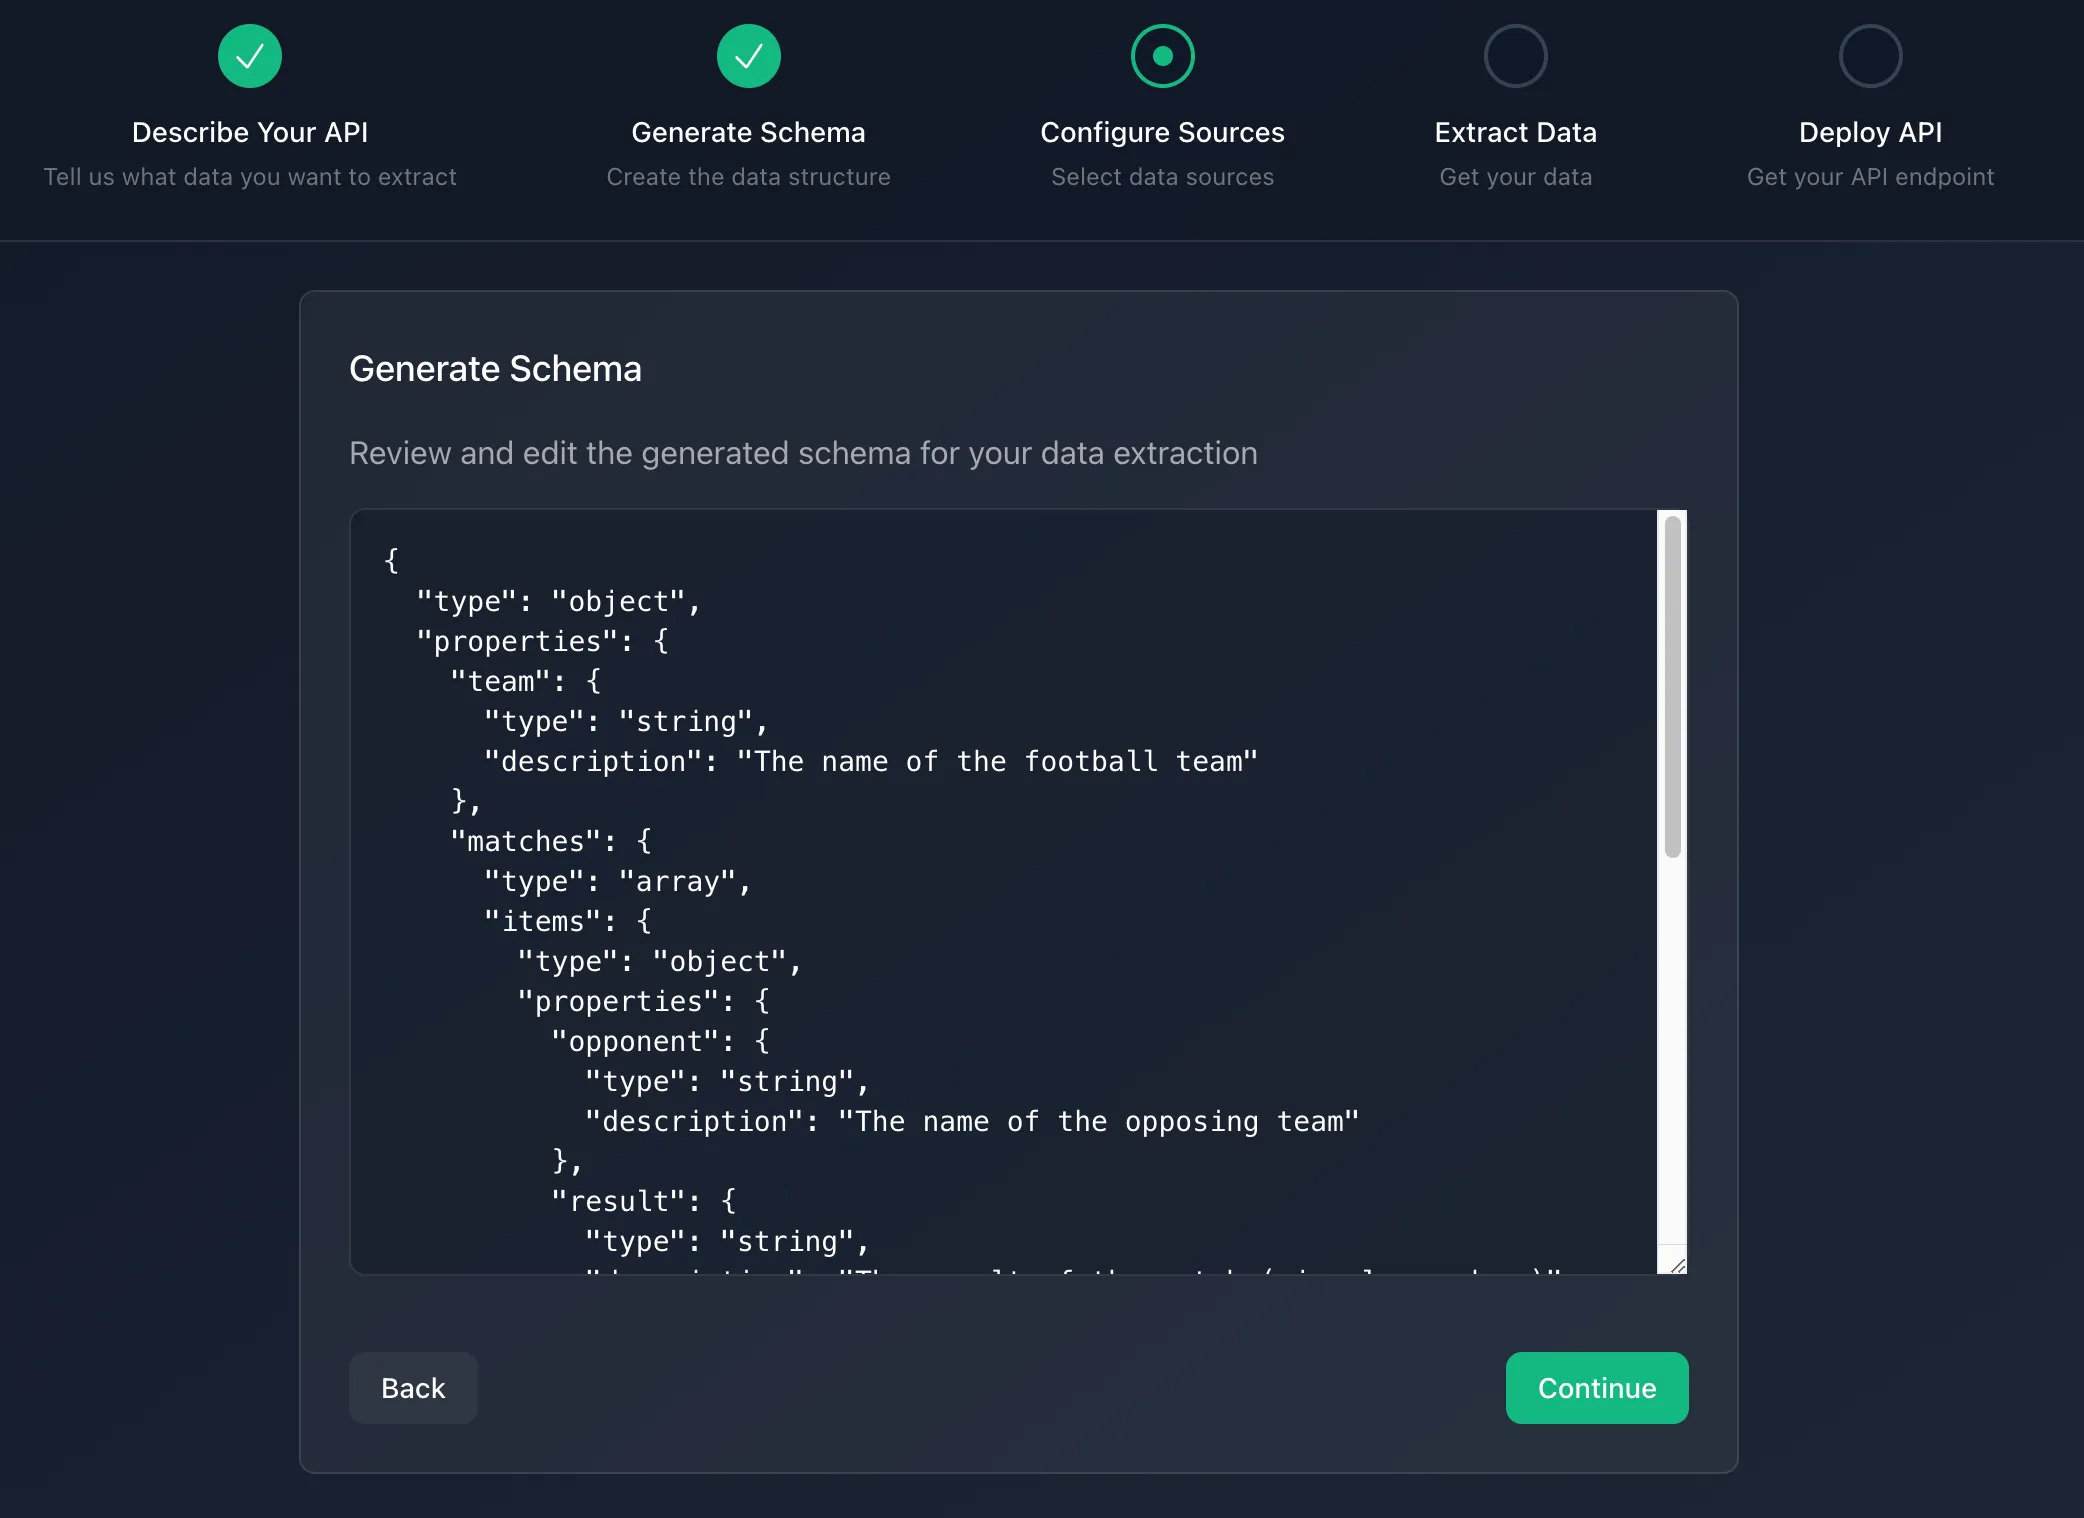
After describing your API, the LLM API Engine automatically converts your natural language description into a structured data schema. This crucial step bridges the gap between your plain English request and the structured data you'll ultimately receive.
What is a JSON Schema?
A JSON schema is a formal way to describe the structure of JSON data. Think of it as a blueprint that defines:
- What fields or properties your data will have
- What type each field should be (string, number, boolean, etc.)
- Which fields are required and which are optional
- Any constraints on the data (like minimum values or text patterns)
For example, if you asked for "Extract company name, CEO, and founding year", the schema would define precisely what those data points look like in a structured format.
Under the Hood: How Your Schema Gets Generated
When you submit your description, the system sends it to OpenAI's API with specific instructions to create a JSON schema. Here's what happens behind the scenes:
- API Request: Your description is sent to OpenAI along with a specialized system prompt
- AI Processing: The AI analyzes your description to identify data points and their likely types
- Schema Creation: The AI generates a structured JSON schema that matches your requirements
- Validation: The system verifies the response is valid JSON before proceeding
Here's a simplified version of the actual code the LLM API Engine uses:
// When you click ENTER after writing your description, this process runs on the server
async function generateSchema(query) {
  // Create a chat completion request to OpenAI
  const completion = await openai.chat.completions.create({
    model: "gpt-3.5-turbo",
    messages: [
      {
        // System message instructs the AI how to behave
        role: "system",
        content: `You are a JSON Schema generator. Given a description of data,
                 generate a JSON Schema that matches the description.
                 Follow these rules:
                 1. Use appropriate types (string, number, boolean, array, object)
                 2. Add required fields when they are essential
                 3. Use descriptive property names
                 4. Add descriptions for complex fields
                 5. Use proper JSON Schema format`,
      },
      {
        // User message contains your API description
        role: "user",
        content: `Generate a JSON Schema for this data description: ${query}`,
      },
    ],
    temperature: 0.1, // Low temperature for more consistent results
    max_tokens: 1000, // Allow enough space for complex schemas
  });

  // Extract and validate the schema
  const schemaStr = completion.choices[0].message.content;
  const schema = JSON.parse(schemaStr);

  return schema;
}
Understanding Your Generated Schema
Let's examine a schema generated from our financial data API example:
{
  "$schema": "http://json-schema.org/draft-07/schema#",
  "title": "Technology Company Stock Data",
  "type": "object",
  "properties": {
    "stockPrice": {
      "type": "string",
      "description": "Current stock price with currency symbol"
    },
    "marketCap": {
      "type": "string",
      "description": "Market capitalization with currency symbol"
    },
    "52WeekHigh": {
      "type": "string",
      "description": "52-week high stock price with currency symbol"
    },
    "52WeekLow": {
      "type": "string",
      "description": "52-week low stock price with currency symbol"
    },
    "peRatio": {
      "type": "number",
      "description": "Price-to-earnings ratio"
    },
    "dividendYield": {
      "type": "number",
      "description": "Dividend yield"
    },
    "earningsPerShare": {
      "type": "string",
      "description": "Earnings per share with currency symbol"
    }
  },
  "required": [
    "stockPrice",
    "marketCap",
    "52WeekHigh",
    "52WeekLow",
    "peRatio",
    "dividendYield",
    "earningsPerShare"
  ]
}
Each property in this schema:
- Has a specified type (string, number, object)
- Includes a description explaining what the field contains
- May be marked as required
How schemas map to real-world data
The schema acts as a bridge between your description and the actual data extracted from websites in the next step. It serves several important purposes:
- Clarity: It makes your intent explicit and precise
- Validation: It ensures the data matches your expected format
- Type Safety: It helps prevent errors by enforcing data types
- Documentation: It provides clear descriptions of each field
Behind the scenes, the LLM API Engine converts this JSON schema into a Zod validation schema, which is used to verify that the extracted data meets your specifications (pseudocode):
// Converting JSON Schema to Zod validation schema
function convertJsonSchemaToZod(schema) {
  Create an empty object to store the Zod schema

  For each property in the JSON schema:
    Extract the key and value

    If property type is string:
      Set zodSchema[key] to string type
    Else if property type is number or integer:
      Set zodSchema[key] to number type
    Else if property type is boolean:
      Set zodSchema[key] to boolean type
    Else if property type is array:
      Set zodSchema[key] to array type with any elements
    Else:
      Set zodSchema[key] to any type

    If property has a description:
      Add the description to the zodSchema[key]

  Return a Zod object schema containing all properties
}
Tips for optimizing your schema
While the schema is generated automatically, understanding it can help you get better results:
- Review field types: Make sure each field has the appropriate type (string, number, boolean)
- Check required fields: Verify that essential data is marked as required
- Understand nested objects: Complex data might be organized into nested objects
- Look for arrays: Lists of items will be represented as arrays
What to avoid
Some common issues to watch for in generated schemas:
- Overly nested structures: Sometimes the AI might create unnecessarily complex nested objects
- Inappropriate types: The AI might choose string for numerical data if formatting is mentioned
- Missing fields: Occasionally, the AI might miss some fields from your description
With a well-defined schema in place, the LLM API Engine now knows exactly what data to extract from your sources. Next, we'll move on to selecting those sources in Step 3.
Step 3: Configuring Data Sources
With your schema defined, the next step is to tell the LLM API Engine where to find the data. The system helps you identify and select websites containing the information you need.
Finding Relevant Sources
The engine provides two convenient ways to select data sources:
- Search-based selection: Use the built-in search functionality to find relevant websites
- Custom URL entry: Directly enter specific URLs you already know contain the data
Automatic Search Results
When you proceed to this step, the system automatically runs a search query based on your API description to find the most relevant sources. This search is powered by Serper, which provides Google search results through an API. For each search result, you'll see:
- The page title
- A snippet of text from the page
- The URL
- A favicon for easy visual identification
By default, the first result is pre-selected, but you can select multiple sources by clicking on them. You can also deselect any result.
Adding Custom URLs
In addition to search results, you can manually add specific URLs that you know contain the data you need. This is useful when:
- You already know the best sources for your data
- You need to extract from internal or private web pages (that are publicly accessible)
- Search results don't include the specific sources you want
Simply enter the full URL (including http:// or https://) in the custom URL field and it will be included in the data extraction.
Managing Multiple Sources
You can select multiple sources for data extraction, which provides several benefits:
- Data verification: Extract from multiple sites to cross-reference and validate information
- Comprehensive coverage: Different sources might provide complementary data points
- Fallback options: If one source fails or changes structure, others can still provide results
Best Practices for Source Selection
For optimal results, consider these strategies when selecting data sources:
-
Choose authoritative sources: Select websites with reliable, up-to-date information. For financial data, prioritize well-established financial portals or official company pages.
-
Evaluate page structure: Pages with clear tables, lists, or structured sections yield better extraction results than dense paragraphs of text.
-
Consider multiple sources: Select a few different sources to get comprehensive coverage and fallback options if one source fails.
-
Check for dynamic content: If a website uses extensive JavaScript to load data, the extraction may need special handling. Test different sources if you encounter issues.
-
Prefer stable URLs: Websites that maintain stable URL structures will provide more consistent results over time.
With your data sources configured, the LLM API Engine is now ready to extract structured data using Firecrawl's intelligent extraction capabilities, which we'll explore in the next section.
Step 4: Intelligent Data Extraction with Firecrawl
With your sources selected, the LLM API Engine now handles the most complex part of the process: extracting structured data from unstructured web content. This is where Firecrawl comes in.
What is Firecrawl?
Firecrawl is a powerful AI-powered web extraction engine that combines:
- Web crawling: Efficiently navigating and collecting content from web pages
- Large language models: Understanding website content semantics and context
- Structured extraction: Converting unstructured text into your specific schema
Unlike traditional web scrapers that rely on brittle selectors or regular expressions, Firecrawl uses AI to understand the meaning and context of web content, making it much more resilient to design changes.
The Extraction Pipeline
Once you click "Continue" after selecting the sources, Firecrawl goes into action and scrapes the information you are looking for based on your initial query and the generated Zod schema. Here is the simplified version:
import { Firecrawl } from "firecrawl";

// Initialize the Firecrawl client
const firecrawl = new Firecrawl({
  apiKey: process.env.FIRECRAWL_API_KEY || "",
});

// Later in your code, use it to extract data
const result = await firecrawl.extract(selectedUrls, {
  prompt: "Your initial query",
  schema: zodSchema, // Generated by OpenAI model
});
Result will contain an output like below if the extraction is successful:
{
  "peRatio": 26.71,
  "52WeekLow": "83.54",
  "marketCap": "103.863B",
  "52WeekHigh": "157.54",
  "stockPrice": "93.22",
  "dividendYield": 0.49,
  "earningsPerShare": "3.49"
}
Zod Schema Validation
Let's take a closer look at a critical part of the extraction process - validation using Zod. While the LLM is good at extracting data, Zod ensures it meets your exact requirements:
// Server-side validation example
const extractRequestSchema = z.object({
  urls: z.array(z.string()).min(1),
  query: z.string(),
  schema: z.object({}).passthrough(),
});

// Validate incoming request
const { urls, query, schema } = extractRequestSchema.parse(body);

// Example of response validation with dynamically generated schema
const responseSchema = z.object({
  stockPrice: z.string().describe("Current stock price with currency symbol"),
  marketCap: z.string().describe("Market capitalization with currency symbol"),
  peRatio: z.number().describe("Price-to-earnings ratio"),
  dividendYield: z.number().describe("Dividend yield"),
  // Additional fields as defined in your schema
});

// Validate extraction results
const validatedData = responseSchema.parse(extractionResult);
When defining Zod schemas for Firecrawl (which OpenAI does for already), it is important to provide field descriptions with .describe() in natural language as the underlying AI-engine of Firecrawl will use them to locate the relevant HTML and CSS selectors containing the information we are looking for.
Other benefits of Firecrawl for your projects
One of Firecrawl's strengths is its ability to handle dynamically loaded content. When a web page loads content using JavaScript (which is common in modern websites), Firecrawl:
- Can wait for page load
- Processes dynamic elements: Captures content that appears after initial load
- Handles pagination: Can navigate through paginated content if needed
- Take actions: Can click buttons, write text and select elements to get the desired content materialize on the page
Common Extraction Challenges
When working with web extraction, you might encounter these challenges:
- Content Changes: Websites frequently update their design and content structure
- Missing Data: Some fields might not be available on all sources
- Format Variations: The same data point might be formatted differently across sources
- Rate Limiting: Some websites might restrict frequent access
- JavaScript-Heavy Sites: Complex single-page applications can be challenging
Firecrawl addresses these challenges through its AI-driven approach, but it's good to be aware of potential limitations.
With your data successfully extracted, you're ready to move to the next step: deploying a production-ready API endpoint that will serve this data to your applications.
Step 5: Deploying Your API
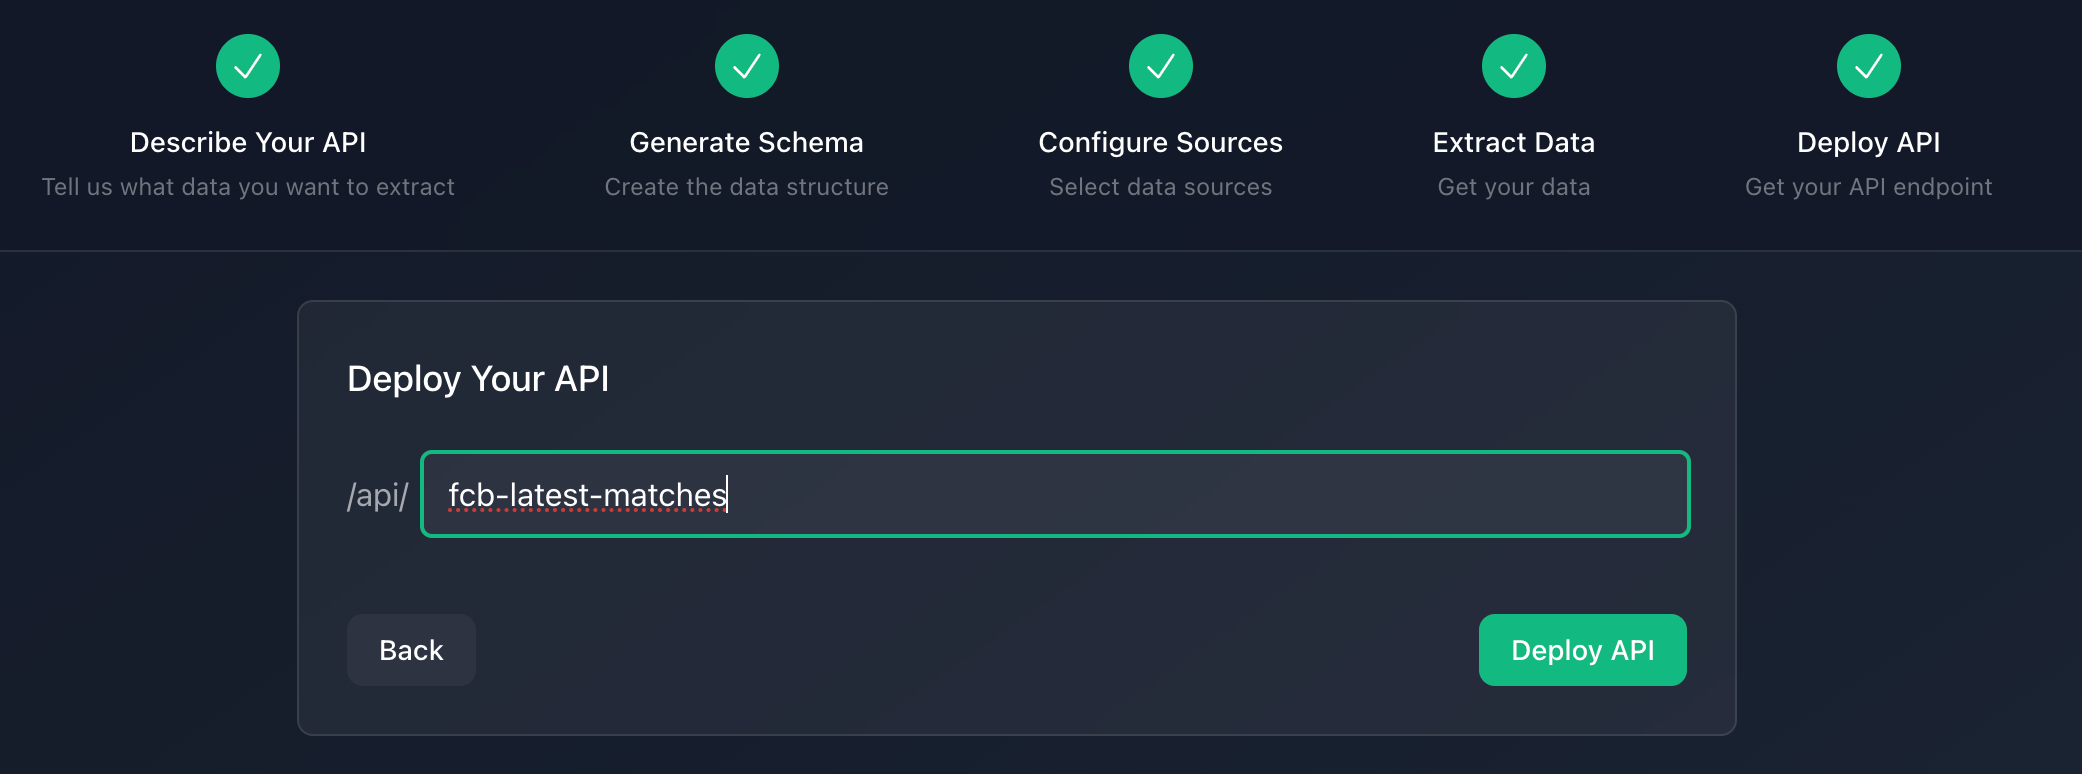
After successfully extracting structured data, the final step is deploying a production-ready API endpoint. This transforms your one-time extraction into a reusable service that applications can query on demand.
What Happens When You Deploy
When you click the "Deploy API" button, the LLM API Engine starts a multi-stage process to create a production-ready API endpoint:
- Endpoint Generation: A unique API endpoint is created specifically for your data
- Schema Registration: Your Zod schema is registered for request validation
- Source Configuration: Your selected data sources are linked to the endpoint
- Cache Configuration: Redis caching is set up for performance optimization
Scheduled Updates with CRON
For endpoints configured with scheduled updates, the system sets up CRON jobs. The CRON service triggers endpoint refreshes according to the schedule, ensuring your API always provides up-to-date data. From the UI, you can configure the refresh frequency using the settings button in the bottom right.
Authentication Layer
The API implements a simple yet effective authentication mechanism using API keys:
- Key Generation: A random hexadecimal string is generated when the API is deployed
- Key Association: The key is associated with the specific endpoint in Redis
- Request Validation: Each API request validates the provided API key
- Rate Limiting: Basic rate limiting is implemented based on API key usage
This approach balances security with simplicity, making it easy to integrate with various clients while preventing unauthorized access.
Accessing Your API
Once deployed, you can access your API using standard HTTP requests:
// Example of how to call your API from JavaScript
async function fetchData() {
  const response = await fetch("http://localhost:3000/api/results/financial-api", {
    method: "GET",
    headers: {
      Authorization: "Bearer your-api-key",
    },
  });
  if (!response.ok) {
    throw new Error(`API request failed: ${response.status}`);
  }
  return await response.json();
}
Performance Optimizations
The deployed API includes several performance optimizations:
- Response caching: Results are cached to reduce extraction overhead
- Conditional extraction: The system only re-extracts data when necessary
- Parallel processing: Multiple sources are processed concurrently
- Compressed responses: HTTP responses are compressed for faster delivery
- Edge deployment: APIs are deployed close to users for lower latency
With your API successfully deployed, you now have a production-ready endpoint that can be integrated into applications, dashboards, or other services.
Conclusion and Next Steps
The LLM API Engine represents a paradigm shift in how developers can create data extraction APIs. By combining the semantic understanding capabilities of large language models with structured data validation and intelligent web extraction, you can now build in minutes what previously took days or weeks of development. This approach dramatically reduces the maintenance burden typically associated with web scrapers while providing more resilient and adaptable data extraction.
Firecrawl sits at the heart of this technology stack, enabling the bridge between unstructured web content and your structured API schema. Its AI-driven approach to extraction means your APIs can continue functioning even as websites change their layouts or structure.
As you incorporate these technologies into your own projects, remember these key takeaways:
- Focus on clear schema definitions with descriptive field explanations to guide the AI extraction
- Select multiple diverse sources to improve data reliability and coverage
- Implement appropriate caching strategies to balance freshness with performance
- Design your APIs to be resilient with proper error handling and fallbacks. T
he combination of LLMs and structured extraction opens up a new world of possibilities for working with web data - one where the technical barriers of web scraping no longer limit what you can build.